
I'm thrilled to be joining the fun over at Pretty Pink Posh for a special edition of the 10 minutes craft dash!

You have from now until December 15th, to create a fabulous project, and all you have to do is make it in under (or around) 10 minutes, and feature a red element in your project (a no-brainer, so close to Christmas!)
There is a great prize up for grabs: check out Pretty Pink Posh for all of the details.
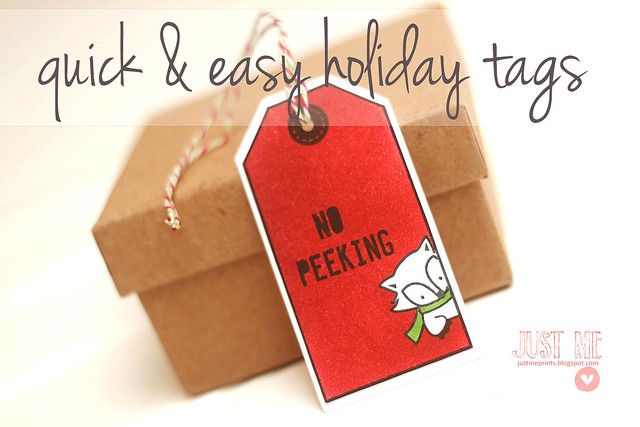
For my project, I created a set of 3 Christmas tags, using the adorable "no peeking" set by Mama Elephant. The only thing I did ahead of time was to create a slightly larger cut file of the tag image, and set it to cut in my cameo silhouette while I was crafting. I ended up with an entire sheet of white tags that I could layer my quick & easy tags onto...
First thing:
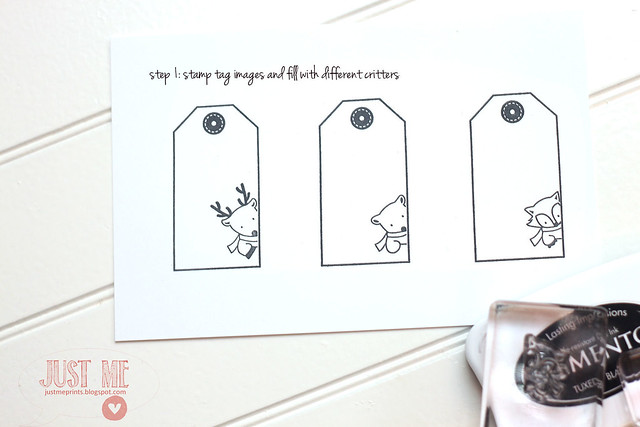
Stamp the tag images and the little critters, as well as the hole-reinforcer image. Took barely a minute. Then, place masks onto the critters (I ALWAYS create masks when I first receive a stamp set, especially if it involves adorable critter images. I store them with the stamp set for future use. It's part of my before-I-play-with-the-set rituals.)

Once the masks are in place, grab a sponge and some juicy red ink (I used Fresh Ink, but you could use Distress Ink) and start building up the red color. I love that this gave me all kinds of shadows and variations of color. I took my time here - this step took me about 3 minutes.
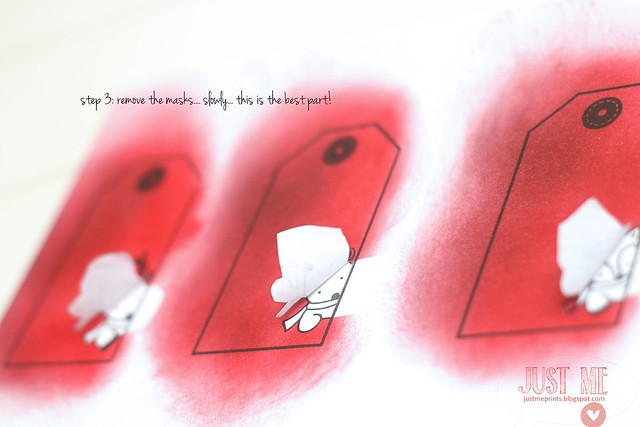
Now, slowly unmask the images. Perfection! Stamp the "no peeking" sentiment on each tag, color in the scarves, cut each tag out and adhere to the larger white tags. Three holiday tags created in 9 mins, 35 seconds...
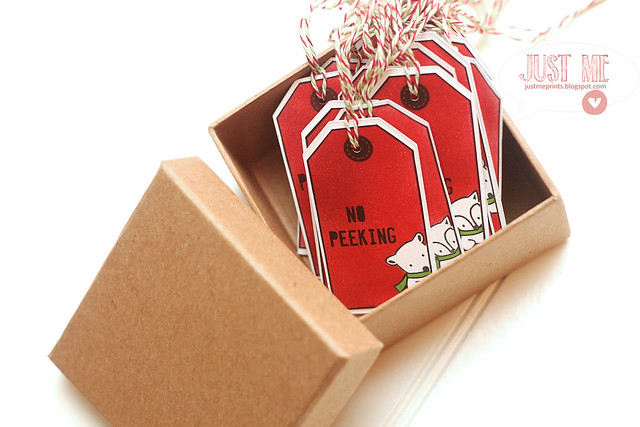
Then, with the time run out, make some more tags because this was too much fun:
If you'd like to see more of me today, I have a card up on the CSS app today:
-AppSneak.jpg)
Click on the image to be whisked away to the app store.
Thanks for stopping by!
Your tags are just darling, and I love the format of your tutorial. It was so quick and easy to see what you did, and way easier for me than watching a video (always have good intentions of seeing those, but rarely have the time). I'm looking forward to you showing some holiday pictures of your little cuties later this year (and, I mean your 3 human cuties).
ReplyDeleteadorable tags!!!!!! and thank you so much for the tutorial!
ReplyDeleteHow fun a tutorial, the tags a adorable
ReplyDeleteSuper cutes! I'm a recent ink blender convert and I agree that the variation gives it that something extra. Do you use Eclipse masking paper?
ReplyDeleteReally, really cute tags!
ReplyDeleteSuper adorable and I would have never guessed you were able to create in less than 10 minters! Wow! They are super darling! What a great idea to already have a mask made.
ReplyDeleteElena, just when I think you can't impress me any more than you already have...YOU DO!
ReplyDeleteThese tags are absolutely darling! Also, it's a genius idea to create masks as soon as you get a set- I'll need to start doing that! Love these tags- they're going to look awesome on gifts!
Wonderful! and thanks for the tutorial!
ReplyDeleteLove your tag set! I love your trick of masking right away too! And it gets your stamps all inked up!
ReplyDeleteOh my word, these are ADORABLE!
ReplyDeleteSigh, I didn't order this set..... and now I'm totally regretting it! Very cute, Elena! Thanks for sharing how you made them!
ReplyDeletewhat Leigh said! lovely
ReplyDeleteOK those are cute! I love how you did this!
ReplyDeleteI LURVE these tags Miss Lady!!! That is all.
ReplyDeleteSo awesome! I love that stamp set. I think that's going to go on my MUST HAVE list for next Christmas.
ReplyDeleteWhat a clever way to make these tags quickly! Love them! Can't wait to ink up this set now!
ReplyDeleteOh wow, these are so vibrant! They look printed. Thanks for showing us how you did it. Fantastic idea, Elena!
ReplyDelete